Blog postAngular forms — learn now and learn well

Angular form, NgForm and two-way data binding

Published August 15, 2018

One of the most important components of any website is the HTML form because it allows users to interact with the app. In this tutorial, we will explore the Angular way to produce smart and highly interactive forms.

The example in the tutorial is of a form into which users enter the details of a car model, such as the name and price of the model, and whether it is a convertible.

In this tutorial you will learn:

  1. Generate an Angular app
  2. The CarModel class
  3. Import the FormsModule
  4. The code for the component
  5. The HTML form
  6. Two-way data binding
  7. Tracking the model in real-time
  8. NgForm
  9. Real-time indication and instructions to the users
  10. Form submission
  11. How to prevent submission of an invalid form
  12. Resetting the form
  13. Conclusion

# 1. Generate an Angular app

> npm install -g @angular/cli
> ng new formApp

Here we use the Angular CLI to generate the app. If you need a little more background, you can read the tutorial about installing an Angular app.

To serve the app, once the installation has finished cd into the app folder, and run the application.

> cd formApp
> ng serve --o

# 2. The CarModel class

Let's begin by creating the CarModel class, which contains the fields of the car model. First, cd into the app folder:

> cd app/

To generate the class type the following command in the CLI:

> ng generate class CarModel

Write the following code inside the class:

app/car-model.ts

export class CarModel {
    constructor(public id   : number,
                public name: string,
                public motor: string,
                public hasSunroof : boolean
    ){}
}

The class contains the fields that the car model needs. Including the model's id, name, engine type, and whether the model is a convertible.

# 3. Import the FormsModule

To work with Angular Forms, import the FormsModule into the root module of the application.

app-module.ts

import { BrowserModule } from '@angular/platform-browser';
import { NgModule } from '@angular/core';
import { FormsModule } from '@angular/forms';

import { AppComponent } from './app.component';


@NgModule({
  declarations: [
	AppComponent
  ],
  imports: [
	BrowserModule,
	FormsModule
  ],
  providers: [],
  bootstrap: [AppComponent]
})
export class AppModule { }

It's not enough to import the module; you should also add it to the imports array.

# 4. The code for the component

Write the following code in the component's class:

app.component.ts

import { Component } from '@angular/core';

import { CarModel } from './car-model';

@Component({
  selector: 'app-root',
  templateUrl: './app.component.html',
  styleUrls: ['./app.component.css']
})
export class AppComponent {
  title = 'car model';

  motors = ['petrol', 'electric', 'unknown'];

  carModel = new CarModel(1, '', '', false);

  submitted = false;

  onSubmit(){
    this.submitted = true;
  }

   getCurrentModel() { 
    return JSON.stringify(this.carModel); 
  }
}

• The motors array includes different types of engines (fuel, electricity or unknown).

• The code creates the carModel object from the CarModel class, which is currently empty because we just started.

• When the users submit the form, the onSubmit method changes the value of the variable submitted from false to true.

• The method getCurrentModel() enables the tracking of the data at any time.

# 5. The HTML form

app.component.html

<form>
  <label>Name</label>
  <input name="name" required>

  <br />
  <select name="motor" required>
    <option *ngFor="let motor of motors" [value]="motor">{{motor}}</option>
  </select>

  <br />
  <label><input type="radio" name="hasSunroof" value="true">Has sunroof</label>
  <label><input type="radio" name="hasSunroof" value="false">No sunroof</label>

  <br />
  <input type="submit" value="Save">
</form>

* The HTML code was streaped to the bear minimum so you can see it's most basic markup.

  • We wrapped the form in the <form> tags, so Angular can identify it.
  • The form fields have the same names as the model's fields (name, model, and hasSunroof).
  • The selection list is created inside an ngFor loop.
  • The fields are necessary hence the required attribute which Angular uses for validation.

# 6. Two-way data binding

Two-way data binding enables the communication between the form and the class. It allows for changes in the fields of the model to automagically appear in the form controller, and for the data entered by the user to immediately update the model.

The two-way binding syntax is:

[(ngModel)]="fieldName"

where fieldName stands for the name of the field in the model.

The field name must be unique because it identifies the field.

Add the two-way data binding to the HTML form by attaching a name and ngModel to each controller. For example:

<input type="text" name="name" [(ngModel)]="model.name">

app.component.html

<form>
  <label>Name</label>
  <input name="name" [(ngModel)]="carModel.name" required>

  <br />
  <select name="motor" [(ngModel)]="carModel.motor" required>
    <option *ngFor="let motor of motors" [value]="motor">{{motor}}</option>
  </select>

  <br />
  <label><input type="radio" name="hasSunroof" [(ngModel)]="carModel.hasSunroof" [value]="true">Has sunroof</label>
  <label><input type="radio" name="hasSunroof" [(ngModel)]="carModel.hasSunroof" [value]="false">No sunroof</label>

  <br />
  <input type="submit" value="Save">
</form>

# 7. Tracking the model in real-time

We use the method getCurrentModel() to track the data in the model. For this, add the following code to the HTML file of the component, just beneath the form:

app.component.html

<pre>{{ getCurrentModel() }}</pre>

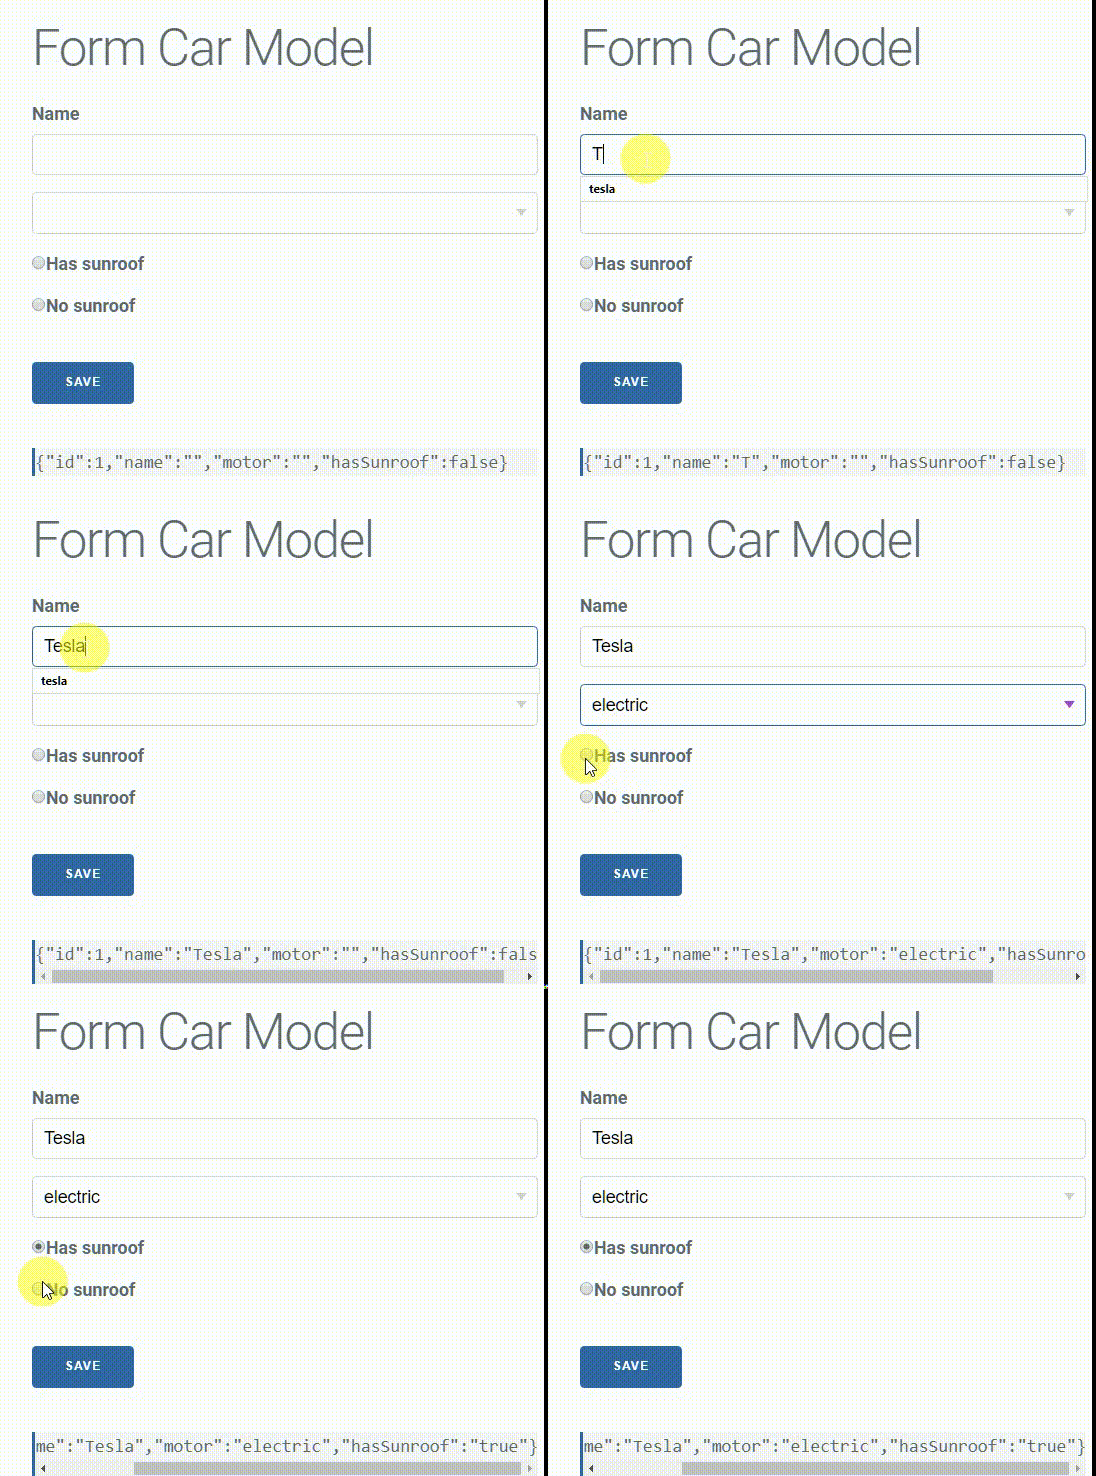
Note that as soon as you enter the data into the form, getCurrentModel() updates the display thanks to the two-way data binding.

demo for two-way data binding in Angular form

# 8. NgForm

Since you imported the NgForm directive into the root module, Angular automatically puts the directive on all the form tags. NgForm holds the data about the values, validation states, and classes of the form.

You can see the change in the state of a form field by attaching a local reference. For example:

<input type="text" name="name" [(ngModel)]="carModel.name" required #trackName>
{{trackName.className}}

#trackName allows us to track the classes of the field:

demo for the change in the class names of an Angular form

Now you can see the classes that Angular attaches to the fields.

Before touching the form:

  • ng-untouched since you haven't touched the field
  • ng-pristine since you haven't changed the value
  • ng-invalid because the field is required but it still doesn't have a value

Enter the field, then leave it without changing its value, and you will get the following combination of classes:

  • ng-touched because you entered the field
  • ng-pristine since you haven't changed the value
  • ng-invalid because the field is required but it still doesn't have a value

Start typing inside the field to see the following classes:

  • ng-touched because you entered the field
  • ng-dirty since you changed the field's value
  • ng-valid because the field passes the validation rule


As you can track the status of the form fields using local reference, you can follow the entire form in the same way.

Attach a local reference to the opening tag of the field:

<form #carModelForm="ngForm">

Add the following code beneath the form to track the state and values in real-time:

{{carModelForm.value | json}}

to see the values of the fields change as you type.

To track the validity of the form.

{{carModelForm.valid}}
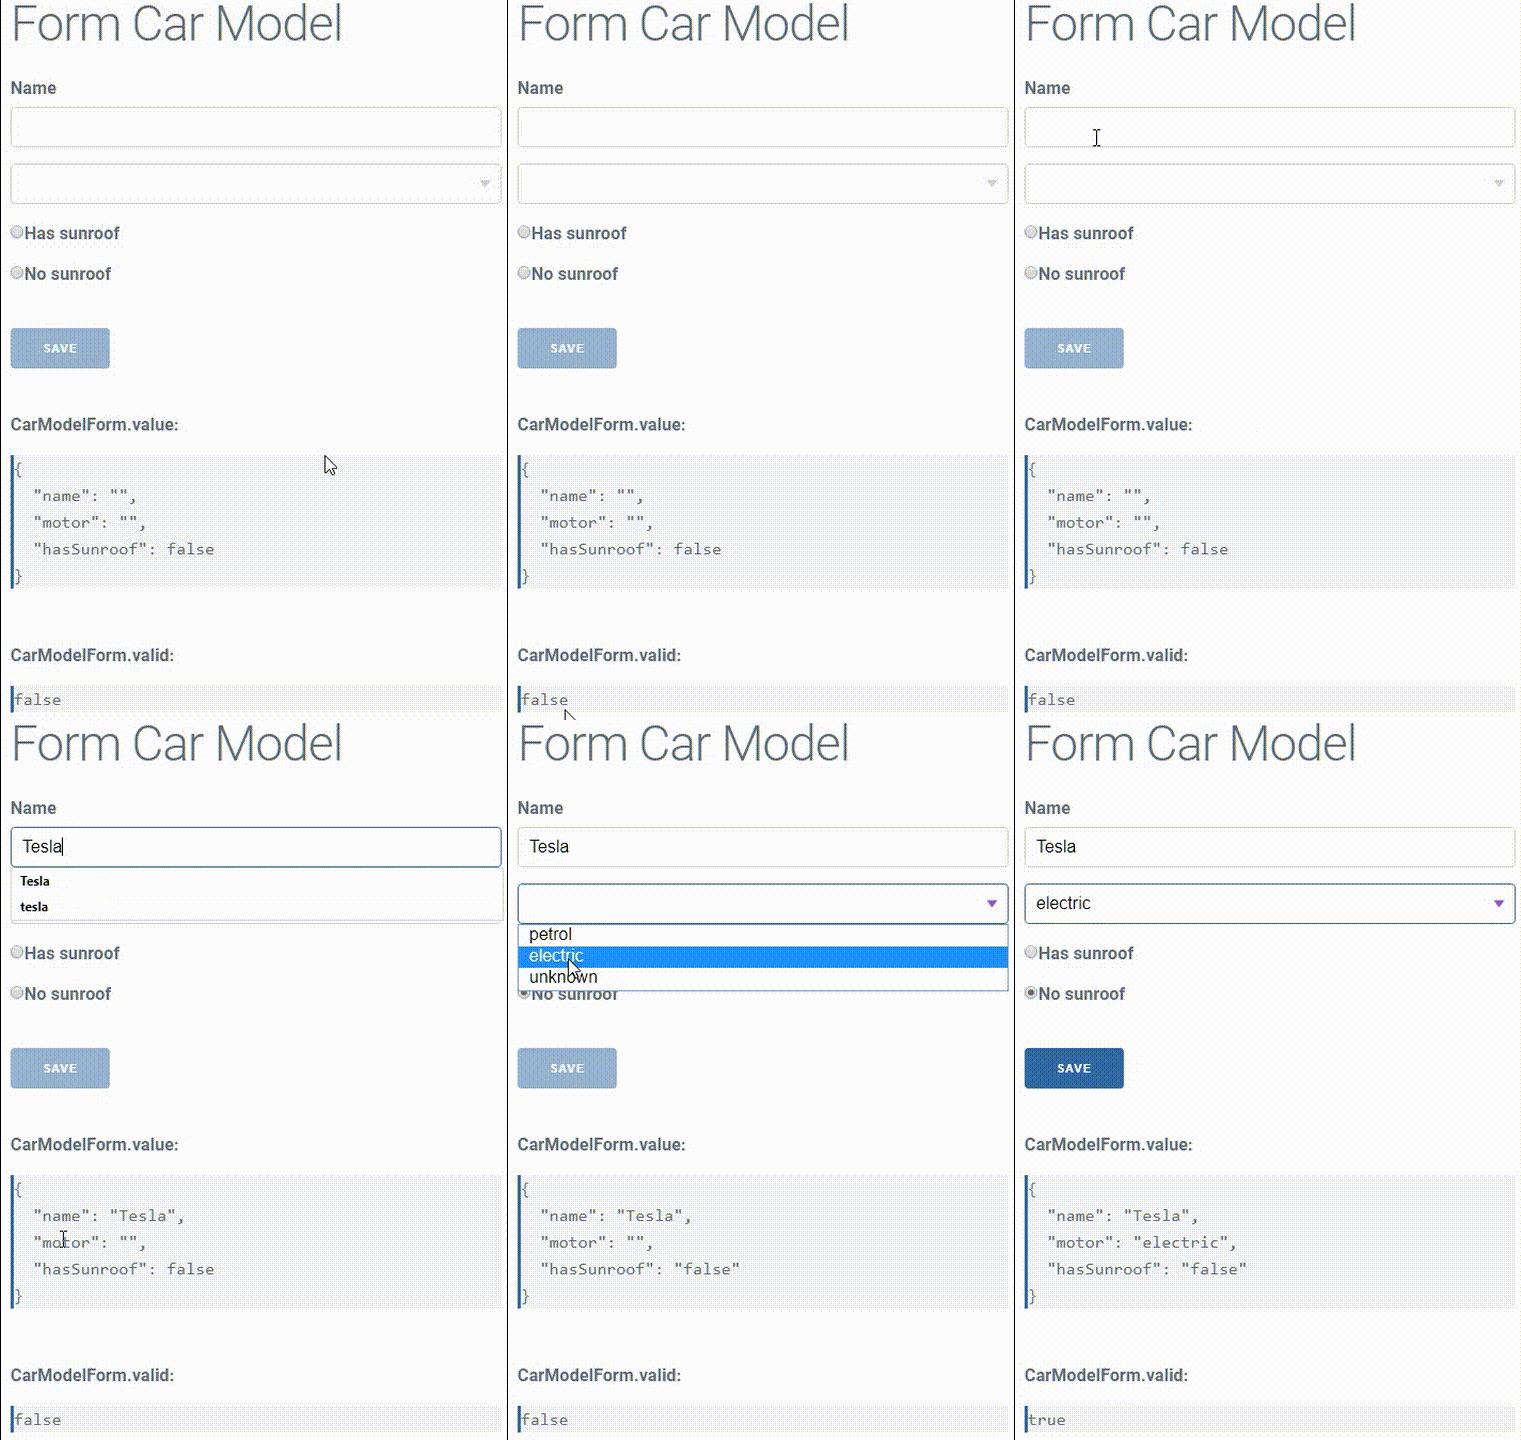
Real time change in the form validation satate and field values

All the form fields are required, and so you need to enter values to all the fields for the validation state to change from false to true.

# 9. Real-time indication and instructions to the users

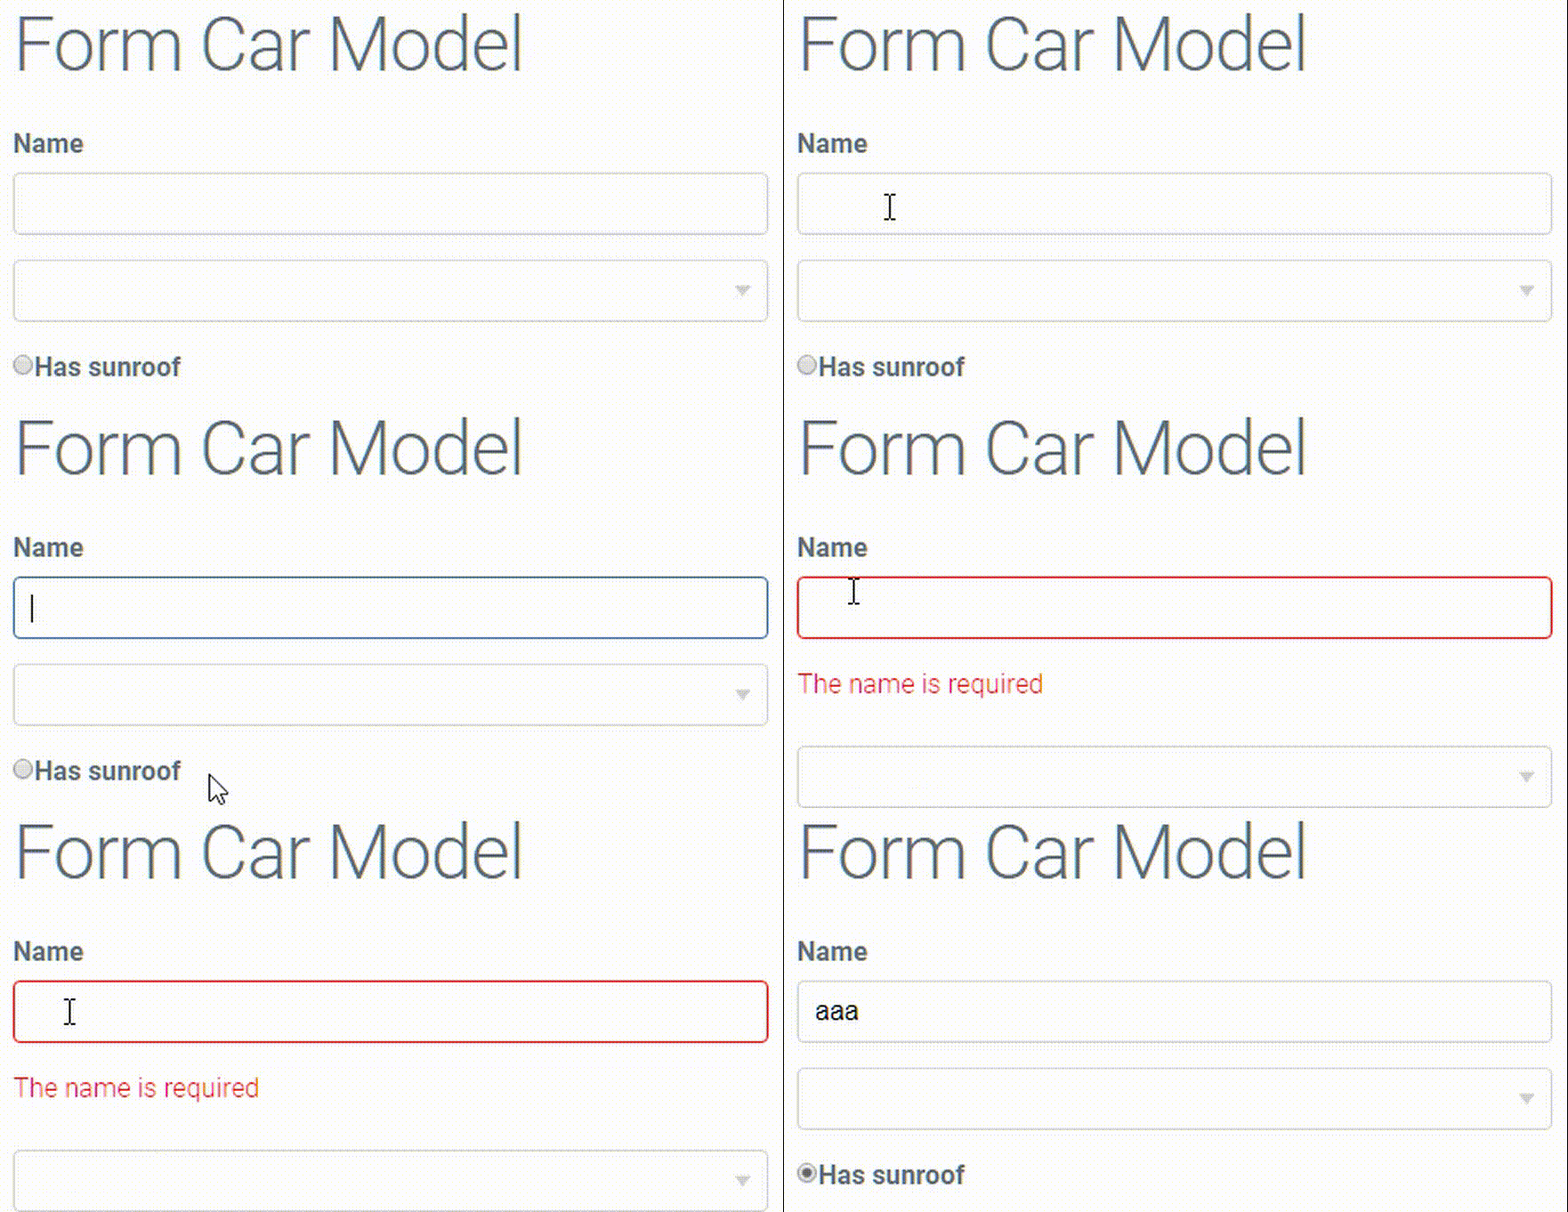
The following message appears when a user enters the field and leaves it empty:

<input type="text" name="name" [(ngModel)]="carModel.name" required #trackName="ngModel">
<p class="alert" *ngIf="!trackName.valid && trackName.touched">The name is required</p>

For the real-time message to work, we have assigned the ngModel directive to the local reference, and so we have features such as valid, touched, and pristine that we can use to guide the user.

Let's use the classes to add CSS rules that can change the appearance of the form according to its condition, for example, a rule to show a red border around the non-valid fields if they were touched.

.ng-invalid.ng-touched:not(form)  {
  border: 1px solid red;
}

הודעות שגיאה בזמן אמת ואינדיקציות ויזואליות כשממלאים טופס אינטר-אקטיבי של Angular

# 10. Form submission

To submit the form, assign a method with the name onSubmit() to the ngSubmit event.

<form (ngSubmit)="onSubmit()" #carModelForm="ngForm">

* You can change the name of the method form onSubmit to any name that you want.

# 11. How to prevent submission of an invalid form

You can avoid submitting a form that is not by valid by binding the disabled attribute of the form to the form state that we know because we are using a local reference to the form.

<input type="submit" value="Save" [disabled]="!carModelForm.form.valid">

# 12. Resetting the form

You can reset the form, including the field values, state, and class names, by using Angular's reset() method.

<form (ngSubmit)="onSubmit(); carModelForm.reset()" #carModelForm="ngForm">

The ngSubmit event calls two methods. The second is reset().

# Conclusion

Forms are a must have to any real-world application. Now that you understand the basics, you can proceed by learning with the tutorials about developing an Angular app with a PHP backend.

comments powered by Disqus