Blog postHow to set up an Angular app

How to set up an Angular app


Angular is a framework designed to run on the client side of websites. The framework is being developed by Google. The code is usually written in TypeScript, not JavaScript.

In this tutorial, we will set up the working environment for an Angular app, and write our first application, hello world.

  1. Install Angular
  2. The file structure of the Angular app
  3. The AppComponent
  4. Let's edit the AppComponent
  5. Conclusion

# 1. Install Angular

The working environment includes:

  1. Command-line tools or terminal (if you work on a Linux or Mac environment there is no problem. On Windows you can use the git bash command line tool that you can download and install from https://gitforwindows.org).
  2. IDE or a reliable code editor. I work with the fantastic VS Code because it supports Angular and it is also free to use.
  3. Installation of the latest version of node.js from https://nodejs.org/en/download.

Node.js comes pre-packaged with npm, the package manager, which we'll use to install the Angular CLI.

The Angular CLI is the command line interface to build an Angular app with a few short commands.

After you installed node.js, run the following command in the terminal to install the Angular CLI:

> npm install -g @angular/cli

The installation may take some time depending on your system's configuration and internet speed.

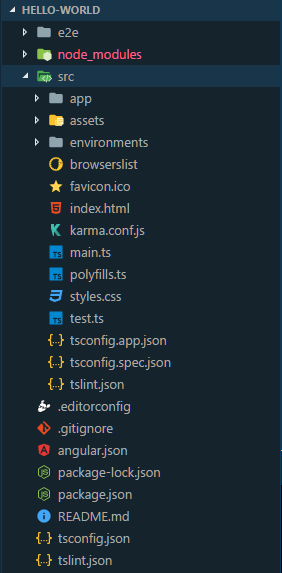
With the Angular CLI installed on your computer, cd into the folder where you want to create the Angular project, and let the CLI generate the project "hello-world" by typing the command.

> ng new hello-world

Running the command will cause the display of these questions that we need to answer in order to set the app:

? Do you want to enforce stricter type checking and stricter bundle budgets in t
he workspace?
  This setting helps improve maintainability and catch bugs ahead of time.
  For more information, see https://angular.io/strict No
? Would you like to add Angular routing? No
? Which stylesheet format would you like to use? (Use arrow keys)
❯ CSS 
  SCSS   [ https://sass-lang.com/documentation/syntax#scss                ] 
  Sass   [ https://sass-lang.com/documentation/syntax#the-indented-syntax ] 
  Less   [ //lesscss.org                                             ] 
  Stylus [ https://stylus-lang.com                                        ]
  • We don't want a stricter checking nor routing, and the stylesheet format needs to be CSS.
  • We may choose otherwise but for now all we want is to run a very simple app.

Once the installation finishes, cd into the newly generated project folder:

> cd hello-world

And serve the app with the command:

> ng serve --open

The serve command launches the server and compiles the TypeScript files to JavaScript because browsers can only run JavaScript, not TypeScript.

The --open flag opens the browser in http://localhost:4200.

First look at the generic page that the Angular app created

* Note that as long as you want the server to work, you need to keep the terminal open.

# 2. The file structure of the Angular app

Use your text editor to open the project folder, and navigate to the src/ folder where most of the development is done. That's the folder structure in the VSCode editor:

The folder structure of an Angular app

  • src/index.html is the main HTML file for the app.
  • src/styles.css is the CSS file shared by all of the components in the application.

# 3. The AppComponent

Let's dive even deeper and open the src/app folder:

The Angular app is divided into components. At this stage, we have one component whose files are in the src/app folder.

Open the src/app folder to see its content:

Folder structure for the Angular app component

The component is called AppComponent and it is the shell component of the application. All of the other components are nested within the AppComponent, either directly or indirectly.

The following files are the most important to know in the AppComponent:

  • app.component.ts contains the TypeScript class for the component.
  • app.component.html contains the HTML part of the component.
  • app.component.css contains the CSS styles for the component.

Another very important file is the module file:

  • app.module.ts is the root module for the application. In this file we inform the app about the parts that it is made of, e.g., the components and modules that make the application.

# 4. Let's edit the AppComponent

Open the app.component typescript file:

src/app/app.component.ts

Open the app component ts file for editing

Or, if you prefer, the live code version:

import { Component } from '@angular/core';
@Component({
  selector: 'app-root',
  templateUrl: './app.component.html',
  styleUrls: ['./app.component.css']
})
export class AppComponent {
  title = 'hello-world';
}
  • In the first line the Component symbol is imported from the Angular core.
  • In the second line the @Component decorator is being set. The decorator's name is prefixed with the @ symbol.
  • The parameter for the decorator is an object with the properties:
    • selector - The CSS selector for the component.
    • templateUrl - The path to the HTML file for the component.
    • styleUrls - The list of CSS stylesheets for the component.

The class contains the code to be shown in the HTML, and at this point it contains one property, the title.

Let's edit the content of the class by changing the title and adding a second property, myName.

src/app/app.component.ts

title  = 'Welcome to the Angular world';
myName = 'Joe';

Give the property myName the right value for you. For me it is "Joe".

Open the HTML file for the compenent, delete its content, and replace with the code:

src/app/app.component.html

<h1>
   {{title}}, {{myName}}
</h1>

The properties from the class are rendered inside the curly brackets, and so we can see them in the browser.


Save the file.

No need to refresh the page since each time that you save your code the CLI automatically refreshes the display.

Then navigate to the homepage to see the result:

Welcome to the Angular world, Joe

# 5. Conclusion

In this tutorial you learned how to set up an Angular working environment and about the root component.

In the real world, the Angular app needs to have a backend. You are invited to learn to develope an Angular app with a PHP backend.

comments powered by Disqus