Blog postGit and Github tutorial

The essentials of Git and Github for web developers

Published Oct 12, 2018

# 1. What is Git?

Git is a version control system, a program that manages and stores versions of the project on which you work and enables you to recall specific versions whenever you need. It also makes it easy to collaborate with other developers, and show your skills to potential employers.

Git main use is to manage software versions and work in collaboration with other developers.

Every project managed by Git is called a repository (or repo), and each repo can include several files and folders.

# 2. What is the difference between a local repository and a remote repository?

In addition to the local repository on your computer, you have a backup in a remote repository on the servers of github.com. The advantages are that you have a backup of your project in the cloud and that you can easily collaborate with other developers.

Git and github local vs remote repository

When you work with Github, the remote repo is in the cloud, at github.com, and every developer in your team needs to have a local repo on his computer. The remote repository is also known as the central repository. Each of the developers can update the central repo with their code, and download the updated version from the central repo to their local repo.

# 3. How to install Git on your computer?

First, you need to register to https://github.com/join and download Git to your computer.

To install Git follow the installation instructions at https://www.atlassian.com/git/tutorials/install-git.

To test the installation, type in the terminal/command line:

$ git

If everything works as expected, you will see a list of Git common commands.

# 4. How to start a new repo?

How to open a git repo at github.com

  • Log in to your account at Github, and navigate to your profile's page at github.com/[your_username].

    * [your_username] is your username at Github.

  • Create a new central repo by clicking the "new repository" button that opens when you click on the plus sign at the upper right-hand side of the screen.

    Press the plus sign to open a new github repo

  • Give the repo the name "exploring_git" so you can follow along with the tutorial.
    Select the "Public" option since the "Private" is for paying customers.
    Check the checkbox "Initialize this repository with a README".
    Click on the "Create Repository" button.

Give the new repo a name and make it public

  • # The page that opens is your project's central repository. In this page, click the button "Clone or download", and from the drop-down menu that opens copy the link so you can clone the repo to your computer.

    How to clone github repository

  • On your computer, use the terminal to cd into the folder where the local repo is going to be, then clone the repo:

    $ cd [folder_name]

    * Replace [folder_name] with the name of the folder on your computer.

    Clone the remote repo into the local repo:

    $ git clone https://github.com/[your_username]/exploring_git.git

    * [your_username] is going to be different than mine.

    To verify the local repository, cd into the folder then type ls to see the names of files and folders:

    $ cd exploring_git
    $ ls -la

    how to clone github repo

  • Still inside the local repo validate that it is a clone of the central repo by typing the command:

    $ git remote -v

    with the result:

    >> origin https://github.com/[your_username]/exploring_git.git (fetch) 
    >> origin https://github.com/[your_username]/exploring_git.git (push)

    In the first line, the fetch URL from which you can download the remote repo.

    In the second line, the push URL to which you need to upload the changes that you make to your copy of the repo.

    In our case, both URLs are identical.

    fetch and push urls to get repo

# 5. How to upload your code to the central repository?

push changes to the central repo at github.com

After you have downloaded the repo to your computer, you can add files, edit, and delete. From time to time, you will want to upload the changes to the central repo at github.com.

Add index.php file to the local repo:

$ touch index.php

To upload the changes you need to use three commands.

  1. Stage the files:
    $ git add -A
    Staging prepares your project for committing. It moves the files and folders from your working directory to the staging area on your computer.
    The -A flag is for staging all of the files.
  2. Commit the project:
    $ git commit -m "First commit"
    The -m flag enables you to add a remark about the changes that you made to your repo, e.g., "First commit" or whatever you like.
  3. Push your changes to GitHub:
    $ git push
    In this step, you are finally uploading your updates to github.com.

To validate the upload, go to the central repo on github.com, to see the updated version of your project.

# 6. How to prevent the upload of certain files and folders?

Usually, you don't share all your project files and folders for two reasons:

  • Files you don't ever want to upload to the central repo. For example, database access information or the contents of the "vendor" folder that you created with Composer, the dependency manager for PHP.
  • Files and folders you are still working on, and you do not want to share with the rest of the world.

This section addresses the first case.

To prevent the upload of specific files and folders you need to add a .gitignore file to the root folder of the project:

$ touch .gitignore

Inside the ".gitignore" file write the names of the folders and files that you want GIT to avoid from uploading to the remote repository. For example:

.gitignore

database_credentials.php
*.log
*.conf
node_modules/
vendor/
  • To prevent the upload of a file use the filename, e.g., database_credentials.php.
  • To prevent the upload of a file type use the asterisk wildcard (*) followed by the extension name, e.g., *.log.
  • To prevent the upload of a folder specify its name, e.g., vendor/.

Commit the .gitignore file to Github:

$ git add -A
$ git commit -m "Added gitignore file"
$ git push

# 7. How to choose which files and folders to push to the remote repository?

In the previous section, you learned how to prevent the uploading of files and folders, and in this section, you'll learn how to determine which files to upload.

Use the git status command to find out which files in the local repository are different from the remote repository, so you can decide which files to upload to Github. When you decide not to upload a file, you "unstage" it and it appears red. When you "stage" a file it appears green.

Staging prepares your project for committing. It moves the files and folders from your working directory to the staging area on your computer.

stage and unstage commits to github

Let's try it out.

Edit the content of the index.php file:

index.php

    <?php
    $x = 'Welcome to the Git and Github essentials for web developers repository';

Save then use the Git status command to see which files are staged:

$ git status

The file that you haven't "staged" will appear red. Keep in mind that only staged files can later on be commited to the remote repository.

To stage a file, use the git add command with the filename.

$ git add index.php

Use the git status command to verify that the file has been "staged".

$ git status

The staged files and folders appear in green.

Use the git reset command to "unstage" the file and remove it from the list of files that you want to "push" to the remote repository:

$ git reset index.php

Use the git status command to verify that the file has been unstaged.

$ git status

If everything works according to plan "index.php" file should appear in red.

Let's finish this section of the tutorial by commiting the "index.php" file to Github:

$ git add index.php
$ git commit -m "Added index.php"
$ git push

# 8. How to pull the updated version of your project from GitHub?

Occasionally you will want to fetch the project from the central repository and integrate it with your local repo. For example, when you want to sync the local repo with the latest updates that the other developers on your team have done.

To perform the synchronization, you need to use the Git pull command.

$ git pull
  • Don't forget to cd into the local repo on your computer.

As a result, Git will integrate the changes from the remote repository to the local repo on your computer.

# 9. How to compare the local repo to the central repo?

Use Git diff command to compare a modified file in your repo with the version in the central repo:

    git diff [file_name]

For example, modify "index.php" file in the local repo and compare with the remote repo.

Use the Git status command to see the files that have been modified.

$ git status

Compare the local version of the file to the remote with the Git diff command and the name of the file.

$ git diff index.php

use git diff to compare the remote and the local version of the repo

Let's finish this section of the tutorial by pushing the modified index.php file to Github:

$ git add index.php
$ git commit -m "Modified index.php"
$ git push

# 10. What are branches and how to use them?

The idea of branching is that you don't have to work on the same branch all the time. Instead, you can develop your project in a side-branch which is different from the master branch. In the side-branch, you can make all the changes without disturbing the master branch. And only if the changes are successful, you can merge the changes back to the master branch.

You always start with the master branch. To see the list of branches use Git branch command:

$ git branch

With the result:

* master

To create a new branch on your computer use Git branch command with the name of the new branch:

    git branch [new_branch_name]

Let's create a new branch with the name of "b2" inside the "exploring_git" repo:

$ git branch b2

Use Git branch command to see the list of branches:

$ git branch

With the result:

  b2
* master

The asterisk (*) before the branch name indicates the branch you are currently on.

Use Git checkout command to switch to the new branch (b2, in our example):

$ git checkout b2

the branch has changed

Change the code in the new branch as desired. For example, add "script.php" file:

$ touch script.php

In the end, commit the new branch to github.com:

$ git add -A 
$ git commit -m "First commit to the b2 branch" 
$ git push --set-upstream origin b2

Pay attention that the commit is to the "b2" branch, not to the "master" branch.

Now return to the master branch, and verify that its content hasn't changed:

$ git checkout master
$ ls

You can see that the "master" branch is not affected by the side-branch. If you want the code to move from the side-branch to the master branch, you need to merge the branches, as you'll learn in the next section.

# 11. How to merge git branches?

Suppouse your side branch is complete, you can merge it into the master branch.

Switch into the branch you wish to merge into:

$ git checkout master

Inside the branch use Git merge command with the name of the side-branch:

    git merge [side-branch]

In our example:

$ git merge b2

Verify that the branches have merged successfully:

$ ls

With the result:

README.md  index.php  script.php

The "script.php" file originates from the "b2" branch.

Upload the merged repo to the central repository:

$ git add -A
$ git commit -m "Merged with branch b2"
$ git push

Now that the branches are merged, you may wish to delete the side-branch. Use Git branch -d to delete the branch.

$ git branch -d [side-branch]

In our example:

$ git branch -d b2

# 12. How to revert to a previous commit?

Each time that you upload your changes to GitHub, the service saves the previous versions, so you can revert to them whenever you like. How does it work? Each time that you make a new commit to the central repo, Github gives the version a unique id which you can later use to refer to the commit.

To get the list of all the commits, use Git log command:

$ git log

Now, your project's history needs to look something like this:

commit 06bc8f6a6507d766fbe2a808446f51e8fdef5797
Author: your_name 
Date:   Fri Oct 12 21:24:37 2018 +0300

    First commit to the b2 branch

commit c5ac7d5e3c7766a4f34f08d7ade05ee543193457
Author: your_name 
Date:   Tue Oct 12 21:10:04 2018 +0300

    Modified index.php

In each commit, the first line shows the id of the commit and the last line shows the comment.

Use the git checkout command with the unique id to load any old version to your computer. For example, you can revert to the "Modified index.php" commit with the checkout command and the unique id (your id is going to be different than mine):

$ git checkout c5ac7d5e3c7766a4f34f08d7ade05ee543193457

Make copy of the commit in your working directory

This makes a copy of the commit in your working directory.

To replace the content of the "master" branch with the copy of the old commit follow these 3 steps:

  1. Make a branch out of the working directory. For example, create a new branch "b3" then checkout into it:
    $ git checkout -b b3
  2. Change the name of the "master" branch to "old-master":
    $ git branch -m master old-master
  3. Change the name of the "b3" branch to master:
    $ git branch -m b3 master

Switch to the "master" branch and verify that its content is compatible with the that of the old commit:

$ git checkout master
$ ls

Don't forget to push the local repo to the remote:

$ git add -A
$ git commit -m "Reverted to an old commit"
$ git push --force origin master

* Notice the --force flag which forces the commit to happen even if it removes previous commits.

# 13. How to solve merge conflicts?

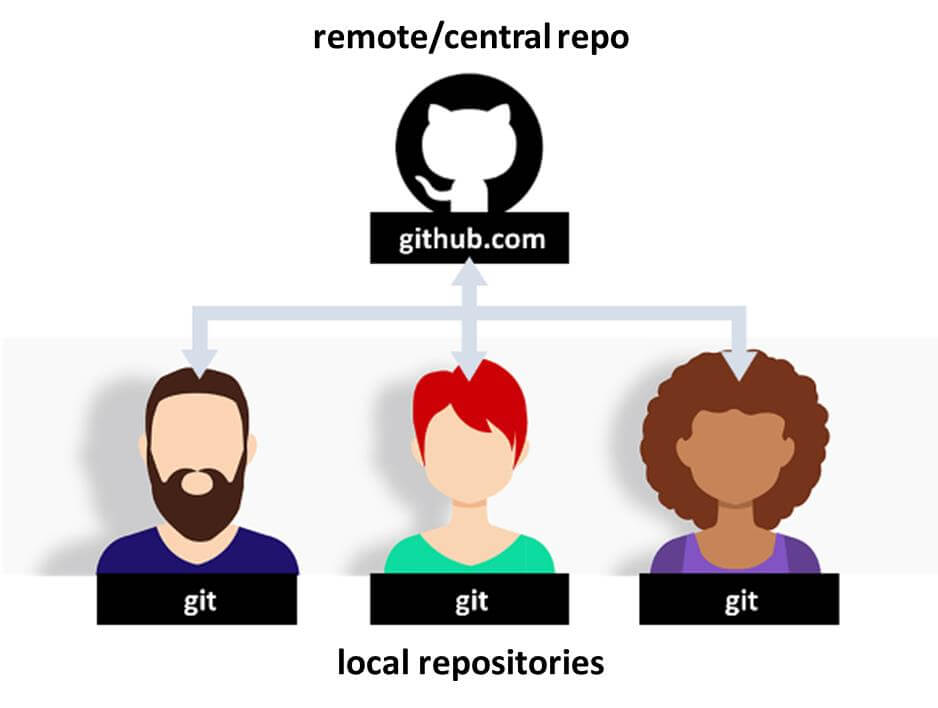
Since working with Github allows multiple developers to work in parallel, each on their copy of the repository, merge conflicts may occur when two developers change the same file and try to upload the changes to the central repo. The way to solve the problem is by pulling the updated version from the central repository, updating the file with your changes, and pushing it back to github.com.

Merge conflict occurs when two developers change the same line in the same file, or when a developer deletes a file.

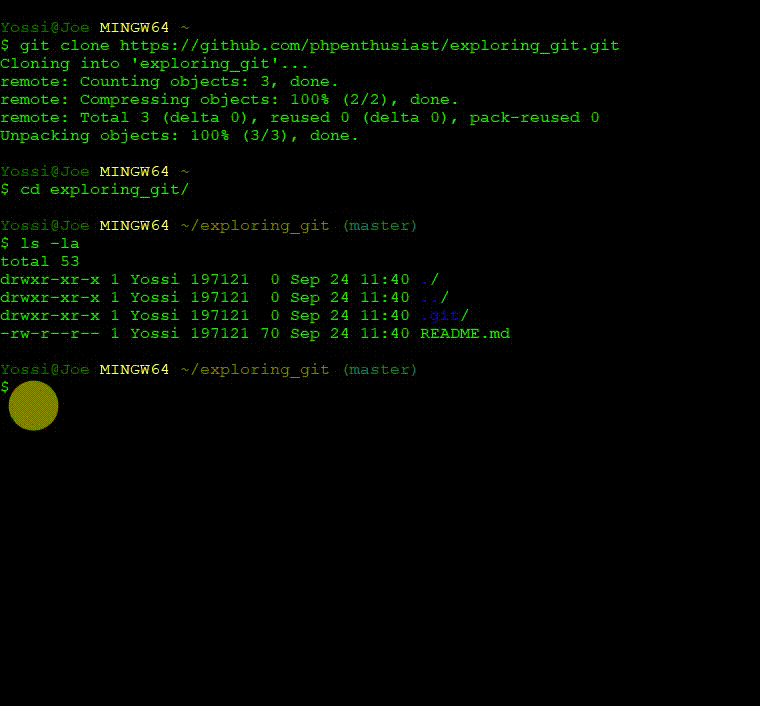
To simulate the problem download a second copy of the "exploring_git" repo to your computer, and place it in a different folder "exploring_git2".

If you can't remmember how to clone the repo read the previous section of this tutorial how to clone a remote repo.

cd into the local repo:

$ cd exploring_git2/exploring_git

Edit the "index.php" file by changing the content of the $x variable:

index.php

    <?php
    $x = 'Welcome to the Git and Github essentials for web developers and programmers repo';

Upload the changes that you have made in the second copy of the repo to github.com

$ git add -A
$ git commit -m "First commit from the second copy"
$ git push

***

Now get out of the second copy of the repo and cd into the first copy:

$ cd exploring_git

Try to change the same line then upload to the remote repo:

index.php

    <?php
    $x = 'Changes in the same line from the first repo';


$ git add -A
$ git commit -m "New upload from the original repo"
$ git push

The result might not be what you expect:

To https://github.com/[your_username]/exploring_git.git
 ! [rejected]        master -> master (fetch first)
error: failed to push some refs to 'https://github.com/[your_username]/exploring_git.git'
hint: Updates were rejected because the remote contains work that you do
hint: not have locally. This is usually caused by another repository pushing
hint: to the same ref. You may want to first integrate the remote changes
hint: (e.g., 'git pull ...') before pushing again.
hint: See the 'Note about fast-forwards' in 'git push --help' for details.

What you see is a merge conflict in action.

To solve the problem do the following:

  1. Pull the remote repo:
    $ git pull

    With the result:
    From github/[your_username]/exploring_git
     * branch            master     -> FETCH_HEAD
    Auto-merging index.php
    CONFLICT (content): Merge conflict in index.php
    Automatic merge failed; fix conflicts and then commit the result.
  2. Open the "index.php" file and you will see something like this:
        <?php
        <<<<<<< HEAD
        $x = 'Changes in the same line from the first repo.';
        =======
        $x = 'Welcome to the Git and Github essentials for web developers and programmers repo';
        >>>>>>> 74934dd8ca1dc11dccccd98671d51e945c68f2f9


    The first line is from the current repo and the second from the other repo.
  3. To resolve the conflict, decide which code to delete or merge the two versions.
        <?php
        $x = 'the merged line';

After you solved the problem, commit the merged file to Github as already explained.

# 14. How to delete your repo?

How to delete Github repo?

  1. Click on the link to the repo that you want to delete at github.com
  2. In the project page that opens click on the "settings" button.
  3. In the settings page scroll to the danger zone, and click on the button "Delete this repository".
  4. In the popup that opens enter the repo's name then click on the button "I understand the consequences, delete this repository".

That's it. You have successfully deleted your repo.

# 15. Conclusion

By reading this tutorial and by practicing its examples, you have become a better developer because you now have under your belt the working knowledge of Github the world's most important development platform.

Happy coding.

comments powered by Disqus