Blog postAngular app with PHP backend: part 4 (DELETE)

Learn to code Angular app with PHP backend: part 4 (DELETE)


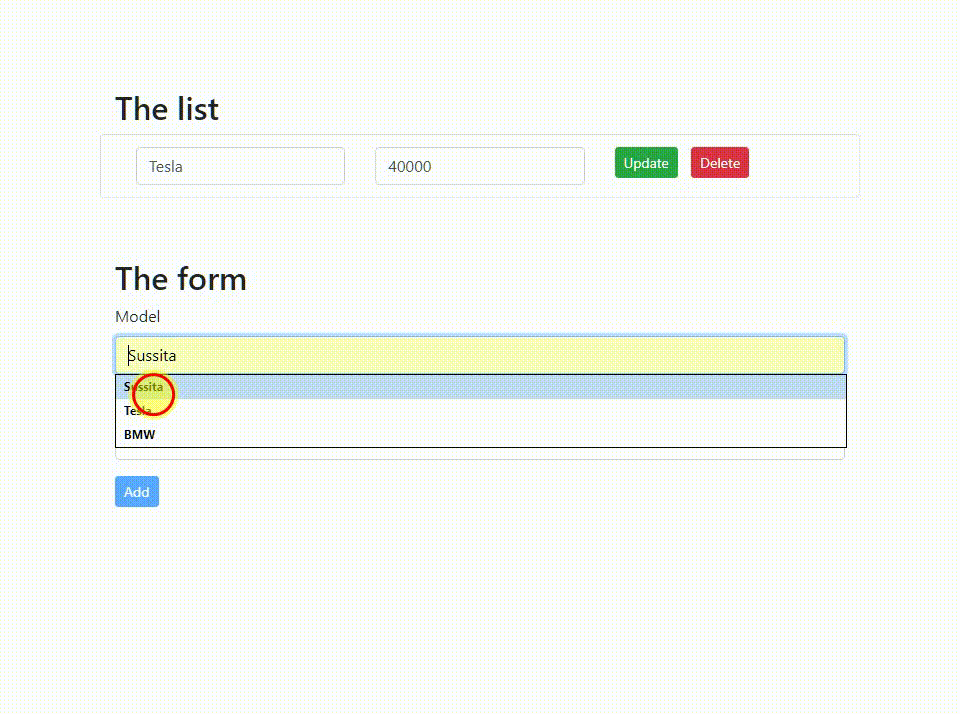
In the fourth and final tutorial in the series about coding an Angular app with a PHP backend, you will learn how to delete an item with the Angular HttpClient's delete() method. In the previous tutorials, you learned how to fetch a list of items from the PHP backend, how to post a new item to be stored in the database, and how to update an existing item.

Demo for the Angular and PHP tutorial

All of the tutorials in the series about developing Angular and PHP application:

  1. How to install Angular?
  2. What is REST API? In plain English
  3. What is Angular Observable?
  4. Angular app with PHP backend: part 1 (GET)
  5. Angular app with PHP backend: part 2 (POST)
  6. Angular app with PHP backend: part 3 (PUT)
  7. Angular app with PHP backend: part 4 (DELETE)

Click to see the code in action

You can dowload the source code from the conclusion section

# 1. The service

Add the delete() method to the service. The method gets the id from the component before sending it to the PHP backend with the HttpClientModule's delete() method.

src/app/car.service.ts

delete(id: any) {
    const params = new HttpParams()
      .set('id', id.toString());

    return this.http.delete(`${this.baseUrl}/delete`, { params: params });
}
  • Angular HttpClient's delete() method accepts the URL as the first parameter and the data (id) as the second.
  • The server side (as you'll see in a moment) returns only success or error codes in the response header.

The full code of the service needs to look something like this:

src/app/car.service.ts

import { Injectable } from '@angular/core';
import { HttpClient, HttpParams } from '@angular/common/http';

import { map } from 'rxjs/operators';
import { Car } from './car';

@Injectable({
  providedIn: 'root',
})
export class CarService {
  baseUrl = 'http://localhost/api/';

  constructor(private http: HttpClient) {}

  getAll() {
    return this.http.get(`${this.baseUrl}list`).pipe(
      map((res: any) => {
        return res['data'];
      })
    );
  }

  store(car: Car) {
    return this.http.post(`${this.baseUrl}/store`, { data: car }).pipe(
      map((res: any) => {
        return res['data'];
      })
    );
  }

  update(car: Car) {
    return this.http.put(`${this.baseUrl}/update`, { data: car });
  }

  delete(id: any) {
    const params = new HttpParams()
      .set('id', id.toString());

    return this.http.delete(`${this.baseUrl}/delete`, { params: params });
  }
}

# 2. The component

Add the method deleteCar() to the component. The method gets the id from the form then subscribes to the delete() method in the service:

src/app/app.component.ts

deleteCar(id: number) {
    this.resetAlerts();
    this.carService.delete(id).subscribe(
      (res) => {
        this.cars = this.cars.filter(function (item) {
          return item['id'] && +item['id'] !== +id;
        });

        this.success = 'Deleted successfully';
      },
      (err) => (this.error = err)
    );
}
  • You need to subscribe since the delete() method in the service is an observable.

The full code of the component:

src/app/app.component.ts

import { Component, OnInit } from '@angular/core';
import { NgForm } from '@angular/forms';

import { Car } from './car';
import { CarService } from './car.service';

@Component({
  selector: 'app-root',
  templateUrl: './app.component.html',
  styleUrls: ['./app.component.css'],
})
export class AppComponent implements OnInit {
  cars: Car[] = [];
  car: Car = { model: '', price: 0 };

  error = '';
  success = '';

  constructor(private carService: CarService) {}

  ngOnInit() {
    this.getCars();
  }

  resetAlerts() {
    this.error = '';
    this.success = '';
  }

  getCars(): void {
    this.carService.getAll().subscribe(
      (data: Car[]) => {
        this.cars = data;
        this.success = 'Success in retrieving the list';
      },
      (err) => {
        this.error = err.message;
      }
    );
  }

  addCar(f: NgForm) {
    this.resetAlerts();

    this.carService.store(this.car).subscribe(
      (res: Car) => {
        // Update the list of cars
        this.cars.push(res);

        // Inform the user
        this.success = 'Created successfully';

        // Reset the form
        f.reset();
      },
      (err) => (this.error = err.message)
    );
  }

  updateCar(name: any, price: any, id: any) {
    this.resetAlerts();

    this.carService
      .update({ model: name.value, price: price.value, id: +id })
      .subscribe(
        (res) => {
          this.success = 'Updated successfully';
        },
        (err) => (this.error = err)
      );
  }

  deleteCar(id: number) {
    this.resetAlerts();
    this.carService.delete(id).subscribe(
      (res) => {
        this.cars = this.cars.filter(function (item) {
          return item['id'] && +item['id'] !== +id;
        });

        this.success = 'Deleted successfully';
      },
      (err) => (this.error = err)
    );
  }
}

# 3. The HTML

Remember the list that shows the names and prices of the list of cars and enables the editing of each car item (if not, you better start by reading the first tutorial in the series). In this tutorial, we will give the list the ability to delete items by adding a delete button.

Replace the content of the list with the following code:

src/app/app.component.html

<div id="theList">
  <h2>The list</h2>

  <div class="container">
    <div *ngFor="let item of cars;let i = index;" class="row">
      <div class="col-4">
        <input type="text"
               [(ngModel)]="cars[i].model"
               class="form-control"
               required
               pattern="^[a-zA-Z ]+$"
               #model="ngModel"
               [ngClass]="{ 'is-invalid': model.touched && model.invalid }">
      </div>
      <div class="col-4">
        <input type="number"
               [(ngModel)]="cars[i].price"
               class="form-control"
               required
               #price="ngModel"
               [ngClass]="{ 'is-invalid': price.touched && price.invalid }">
      </div>
      <div class="col-4">
        <input type="button"
               value="Update"
               class="btn btn-success btn-sm"
               [disabled]="model.invalid || price.invalid"
               (click)="updateCar(model, price, item.id)">
         
        <input type="button"
               value="Delete"
               class="btn btn-danger btn-sm"
               (click)="deleteCar(item.id? item.id:0)">

      </div>
    </div>
  </div>
</div>
  • Angular prints each car item to a separate line of the list.
  • Clicking the "update" button updates the item.
  • Clicking the "delete" button sends the id of the item to be deleted to the component.

# 4. The server side

The following PHP script is responsible for deleting the item from the database on the server side:

api/delete.php

<?php

require 'connect.php';

// Extract, validate and sanitize the id.
$id = ($_GET['id'] !== null && (int)$_GET['id'] > 0)? mysqli_real_escape_string($con, (int)$_GET['id']) : false;

if(!$id)
{
  return http_response_code(400);
}

// Delete.
$sql = "DELETE FROM `cars` WHERE `id` ='{$id}' LIMIT 1";

if(mysqli_query($con, $sql))
{
  http_response_code(204);
}
else
{
  return http_response_code(422);
}
  • In case of error, the code returns a response code from the 400 family (Not sure what it means? read the tutorial about REST API).
  • In the case of success, a response code 204 is returned, which indicates that the operation was successful but no data is returned in the payload (response body).

# Conclusion

That concludes the series of tutorials about developing an Angular app with a PHP backend. We learned quite a lot. Including how to perform the CRUD operations (Create, Read, Update, Delete) with Angular's HttpClient module, and how to consume a REST API. You can make this code suitable for more elaborate needs by separating the CRUD operations into different components, giving it the ability to work with files and images, as well as consuming API which comes from a source that requires authentication, such as a Laravel-JWT app.

Happy coding :-)!

Click to download the source code for the tutorials

comments powered by Disqus